Where digitization begins - ATOS ScanBox "moves" products from two to three dimensions
Source: eKapija
 Thursday, 30.11.2023.
 00:00
00:00
 Thursday, 30.11.2023.
 00:00
00:00
Scanning the product with the ScanBox optical robotic scanner and comparing the measurement results with the 3D model, actually the product project

Their production must have digitized measurements, not only so that manufacturers can compare the product with the tool that made it, but also to avoid mistakes before they occur, to be able to (re)design the product without trial and error which cost a lot in time and money, but also in order to avoid errors in joining with parts from other manufacturers.
The perspective of future production is based on information that provides a deeper insight into production processes, higher quality standards, initiatives for "lean" production, clearer communication and a more developed work culture within a certain organization. These benefits are just some of the values that are realized when starting the journey towards digital transformation.
What are the benefits of digital transformation in manufacturing?
Digital transformation focuses on improvement rather than correction. The digital transformation process improves efficiency in various areas, such as increased employee productivity, communication and collaboration between organizations, and equipment uptime. That increased efficiency results in faster time-to-market, reduced waste and greater workforce retention, which further increases revenue and reduces business downtime.
To initiate digital transformation, the first step is the transition from 2D processes to a three-dimensional world, in which TOPOMATIKA d.o.o. has more than two decades of experience in almost all manufacturing industries. By using digital components, product design evaluation and accuracy verification are performed in a fully simulated environment. This enables the identification of necessary changes that affect quality, costs and efficiency long before physical implementation. Upfront evaluation of these processes reduces variation, eliminates waste, and produces high-quality products with consistent and repeatable results.
Digitization enables faster decision-making using reliable information unavailable through 2D drawings or traditional methods. Visual data facilitates problem identification and transfer of relevant information within the organization. Centralizing information, accessible and understandable to everyone regardless of specific knowledge, improves collaboration by enabling faster problem solving and decision-making, thereby reducing downtime. The conversion of components and processes into the digital sphere enables early detection of problems, the creation of an optimized, reliable and repeatable process, which reduces the waste material created during the production of defective parts. Digital transformation plays a key role in the successful implementation of "lean" production.
Using 3D measurements, the quality, safety and functionality of parts is improved through data visualization and 3D dimensional analysis. Visual data generated through millions of precise 3D coordinate points provides fast information, simplifying the process of product development, quality control, processing and production. Data accuracy also enables simulations of various processes such as material flows and digital product assembly, supporting lean manufacturing initiatives.
ZEISS ATOS ScanBox –continuous quality control possible
An automated optical 3D measuring device accelerates your processes, identifies sources of errors at early stages and ensures competitiveness. For 21 years, TOPOMATIKA d.o.o. has been supplying such devices for non-contact measurements and software that analyze measurement data to customers in the region, in practically all branches of production.
Many companies are having to re-examine their manufacturing and quality control processes due to increasing consumer demands for higher quality of their parts, the ever increasing complexity of geometry and just-in-time manufacturing. Data collection and processing require high performance 3D measuring systems, which is also necessary when measuring parts at a certain speed. Many companies already use the ZEISS ATOS ScanBox optical 3D measuring device to generate data in arrays, reducing costs and operating time.
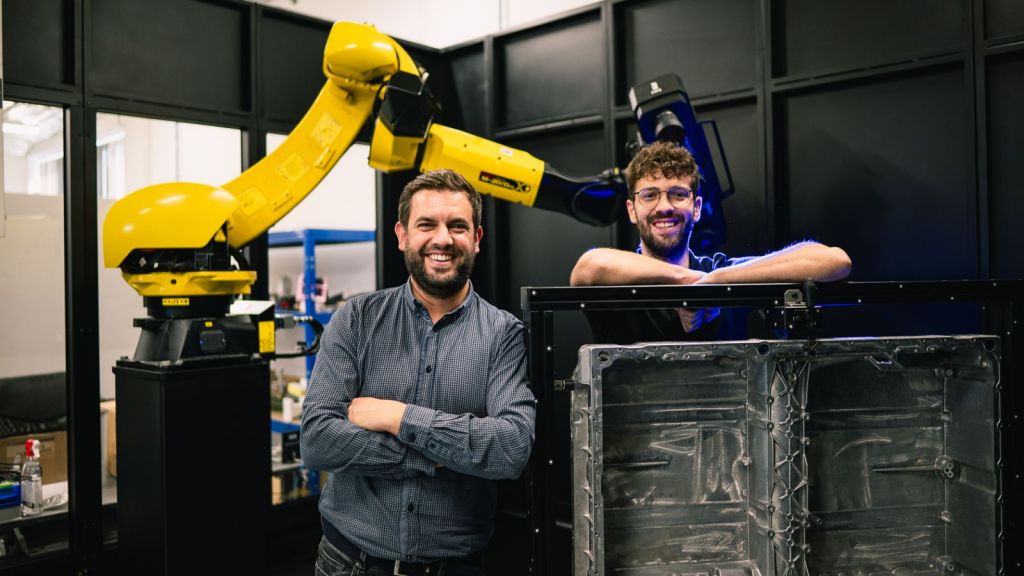
TOPOMATIKA team engineers Josip Kos and Luka Lukacic, experts in automation of measurements, with ScanBox robotic scanner

Standardized ZEISS ATOS ScanBox systems compare all real 3D coordinates of a part with its CAD models or specifications of the measurement plan and compile control reports right next to the production line.
TOPOMATIKA offers 11 different models of optical measuring devices for different purposes and sizes of parts, from carabiners to entire bodies, which enable quick and automated measurements with optimal precision.
ATOS ScanBox systems provide accurate and traceable results, guarantee high throughput and are easy to manage thanks to an intuitive user interface and virtual measurement room (VMR) – software functions for central management and planning of measurements. This comprehensive solution covers all steps of this process, from programming to automated digitization, verification and reporting.
Five reasons in favor of automated quality assurance
Shorter measurement time
Especially for parts with complex geometries or free-form surfaces, the ATOS ScanBox provides 50% - 80% faster measurement.
Easy management
Plan your measurement sequences with just a few clicks and measure in a fully automated process in the virtual measurement room in ZEISS INSPECT Optical 3D software.
Numerous applications
The various ATOS ScanBox systems for parts of different sizes are comprehensive systems that can be installed and used directly in production, saving time and costs.
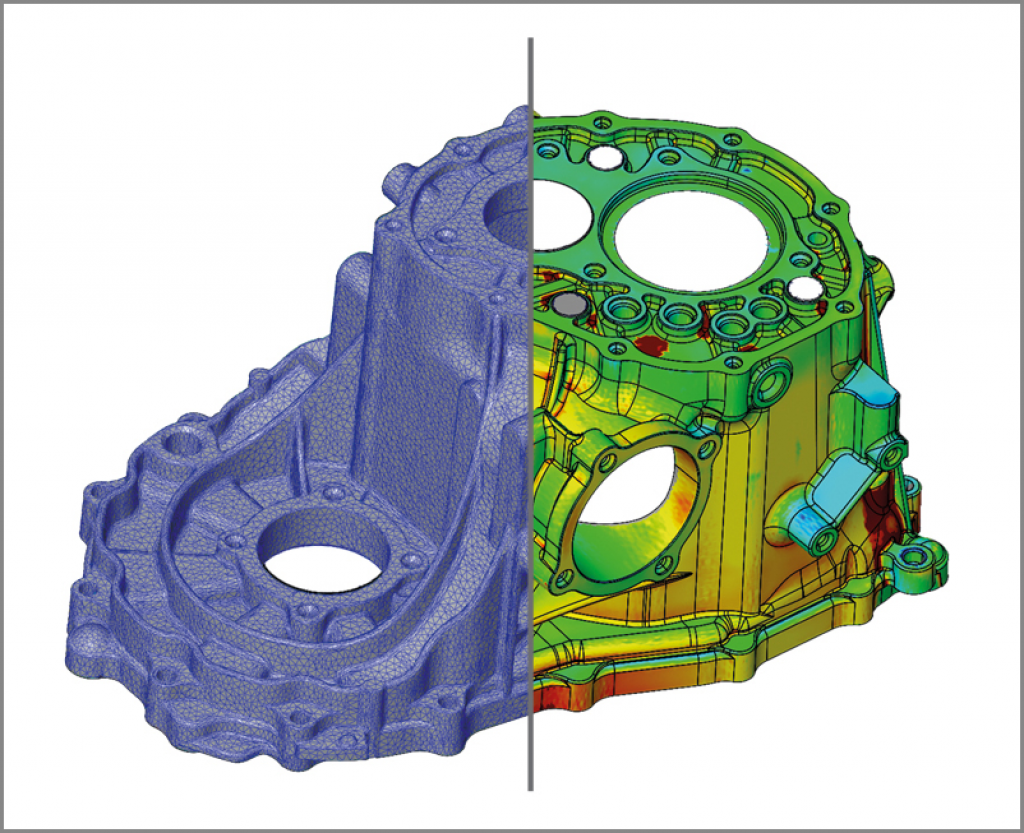
After the optical measurement, the software creates a 3D grid of points - left part of the image, which is later compared with the CAD model of the product to see the differences between the actually made and the projected one - right part of the image

A tool for effective analysis
ZEISS INSPECT Optical 3D automatically generates GD&T data (shape and position tolerance) as well as hole correction and positioning data, and is considered the industry standard among metrology software.
A powerful tool for many industries
ZEISS ATOS ScanBox has positioned itself in the world as the ideal measuring system for production control in a wide range of industries such as automotive, electronics, aerospace and energy.
TOPOMATIKA d.o.o.
Beograd-Zemun, Ratarski Put 57
11080 Galenika
Srbija
Tel: +381 60 3496 011
E-mail: [email protected]
Measuring laboratory and office:
Kraljevačkog bataljona 75
34000 Kragujevac
Serbia

Click here to see the entire Special Edition Newsletter
"DIGITAL TRANSFORMATION - Smart, game-changing solutions"
read more
Companies:
 TOPOMATIKA d.o.o. Beograd
Tags:
Topomatika doo Belgrade
Josip Kos
Luka Lukacic
ZEISS ATOS ScanBox
ZEISS INSPECT Optical 3D software
measurement
digitized measurements
3D measurements
digital transformation in manufacturing
automated optical 3D measuring devices
non-contact measuring devices
software that analyzes measurement data
special edition newsletter
digital transformation
smart game-changing solutions
Comments
Your comment
Most Important News
Full information is available only to commercial users-subscribers and it is necessary to log in.
Follow the news, tenders, grants, legal regulations and reports on our portal.
Registracija na eKapiji vam omogućava pristup potpunim informacijama i dnevnom biltenu
Naš dnevni ekonomski bilten će stizati na vašu mejl adresu krajem svakog radnog dana. Bilteni su personalizovani prema interesovanjima svakog korisnika zasebno,
uz konsultacije sa našim ekspertima.


 Izdanje Srbija
 Serbische Ausgabe
 Izdanje BiH
 Izdanje Crna Gora


 News
News


